If you’re looking for new and exciting ways to celebrate Easter with the older adults in your senior center or activity group, these ten unique ideas will bring cheer, creativity, and a festive spirit. Each activity comes with a fun name you can use in your newsletters or schedules, a supply list, and step-by-step instructions. Enjoy planning an Easter celebration that’s truly one-of-a-kind!
1. “Egg-stravagant Flower Bowls”
Description
Combine the beauty of spring blossoms with the freshness of Easter eggs! In this project, seniors create charming “egg shell” vases or bowls out of papier-mâché, then decorate them with floral designs.
Supplies
Balloons (medium-sized)
Newspaper strips (pre-cut)
Papier-mâché paste (store-bought or homemade flour-and-water mixture)
Acrylic paints and brushes
Artificial or fresh flowers
Ribbon or twine (optional)
How-To Guide
Prep the Balloon: Inflate a balloon to the size of a small bowl. Tie it securely.
Papier-Mâché Layers: Dip newspaper strips in papier-mâché paste and apply them around half of the balloon (leaving the top open like a bowl). Allow the first layer to dry before adding a second or third layer for strength.
Pop & Paint: Once fully dry (this may take up to 24 hours), pop the balloon. You’ll be left with a bowl-shaped shell.
Decorate: Use acrylic paints to create floral or spring-themed designs. Seniors can choose pastel or bright hues—whatever says “Easter” to them!
Finish & Fill: After the paint dries, fill the bowl with fresh or artificial flowers. Tie a ribbon around the bowl’s rim for extra flair.
Why It’s Great
Encourages creativity and hand-eye coordination.
Makes for a lovely, colorful decoration in common areas or personal rooms.
2. “Bunny Tales Story Swap”
Description Combine the joy of storytelling with Easter memories. Seniors will gather in small groups to share personal holiday traditions while creating simple handmade “bunny ears” as conversation starters.
Supplies
Construction paper or cardstock (various pastel colors)
Scissors
Tape or stapler
Markers or crayons
Optional: Stick-on gems or stickers for decoration
How-To Guide
Cut Bunny Ears: Pre-cut strips of paper to fit around the head, plus additional ear shapes.
Assemble Headbands: Let each participant size the strip to their head, then tape or staple it into a loop. Attach the ear shapes to the loop.
Decorate: Use markers, crayons, gems, or stickers to personalize each bunny ear headband.
Share Stories: Wear the bunny ears in a circle. Each person tells a favorite Easter or springtime memory, tradition, or funny story.
Why It’s Great
Encourages social interaction and reminiscence.
Easy, low-cost activity that fosters a sense of community.
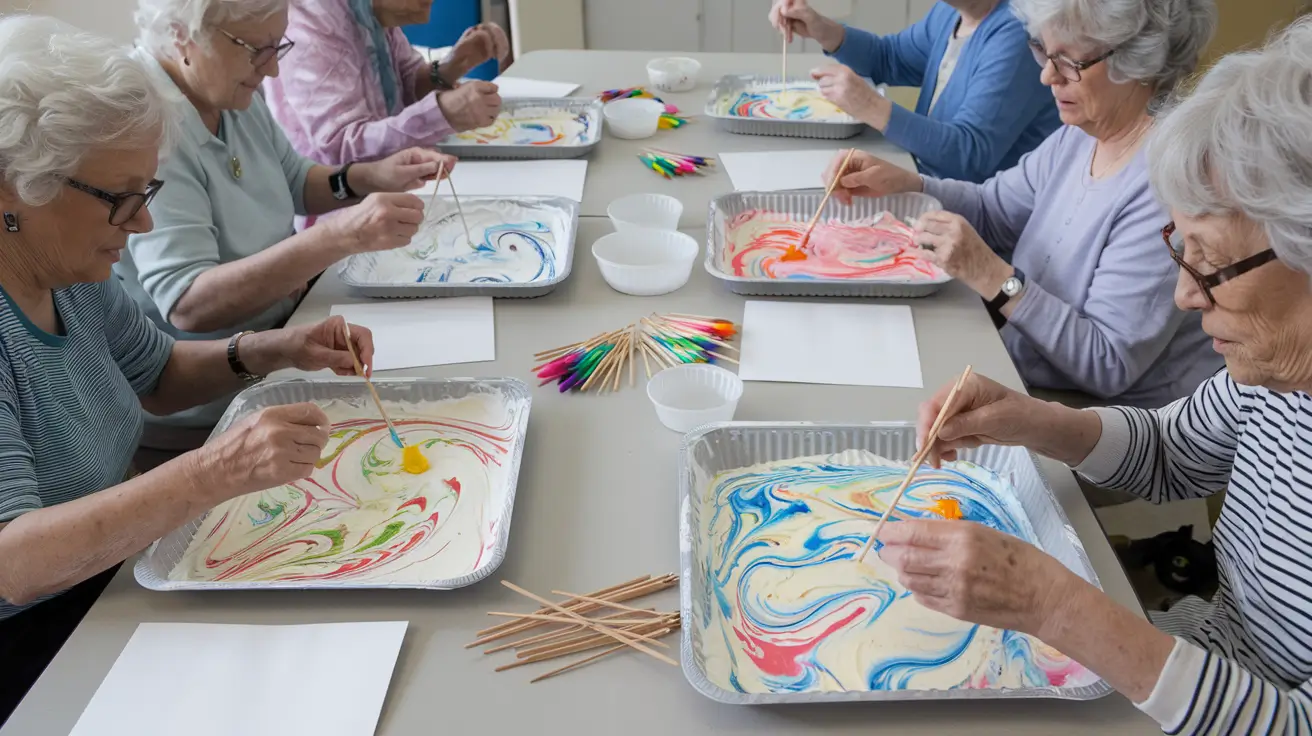
3. “Egg-stravaganza Marble Art”
Description Marbling Easter eggs on paper provides a colorful, eye-catching activity. Seniors can explore patterns and color mixing to create one-of-a-kind prints that can be turned into Easter cards or window art.
Supplies
White cardstock or thick paper
Shallow trays (foil pans or baking sheets)
Shaving cream (foam, not gel)
Liquid food coloring or acrylic paint
Craft sticks or toothpicks
Plastic scraper or ruler
Optional: Egg-shaped stencils
How-To Guide
Prepare the Tray: Fill each tray with a layer of shaving cream.
Add Color: Drip food coloring or paint onto the shaving cream in various spots.
Swirl Patterns: Use a craft stick or toothpick to create marbled designs, swirling gently.
Press Paper: Place a sheet of paper (or paper pre-cut into egg shapes) on top of the marbled cream. Press lightly, then lift.
Scrape & Reveal: Use the plastic scraper to remove excess shaving cream. Watch the beautiful marbled pattern emerge!
Dry & Display: Let the paper dry. Use these marbled “eggs” or sheets as Easter cards or decorations.
Why It’s Great
Promotes sensory exploration with soft, foamy textures.
Ideal for individuals with limited dexterity (minimal fine motor skill needed).
4. “Carrot Patch Muffin Madness”
Description Instead of the typical egg-shaped treats, try a tasty carrot-themed baking session. Decorate muffins (or cupcakes) to look like miniature carrot patches in springtime soil.
Orange candy melts or orange frosting in a piping bag
Green licorice or green frosting for “carrot tops”
Paper muffin liners
Baking pans
How-To Guide
Bake the Muffins: Follow the instructions on your chosen mix. Allow them to cool.
Frost & Dirt: Top each muffin with chocolate frosting. Sprinkle crushed chocolate cookies on top to look like dirt.
Create Carrots: Use orange candy melts (shaped into cones) or orange frosting piped in a carrot shape on top of the “dirt.” Add green licorice or green frosting at the top for the leaves.
Decorate & Serve: Let participants decorate their own “carrot patch” muffins. Enjoy with a cup of tea or coffee!
Why It’s Great
Encourages creativity in the kitchen and fosters a sense of accomplishment.
Smells and tastes delicious—perfect for a festive Easter tea time.
5. “Gentle Bunny Hop & Stroll”
Description Combine light physical exercise with an Easter-themed walk through the facility or a nearby park (if available). Participants wear bunny ear headbands or small Easter accessories, then enjoy a guided stroll with periodic “bunny hop” warm-ups or gentle stretches.
Supplies
Bunny ear headbands (store-bought or homemade from Activity #2)
Comfortable walking shoes/clothes
Portable music player (optional)
Chairs/stable surfaces for those needing support during stretches
How-To Guide
Warm-Up: Gather participants in a safe, open area. Lead simple stretches or a gentle “bunny hop” movement (two steps forward, two steps back).
Stroll: Walk around the center’s garden, hallway loop, or a nearby park at a relaxed pace. Encourage conversation and enjoyment of any Easter decorations along the way.
Cool Down: End the stroll with seated stretches or a gentle upper-body routine.
Why It’s Great
Encourages physical activity in a fun, lighthearted way.
Adaptable to various mobility levels (use wheelchairs, walkers, or assistive devices as needed).
6. “Egg-pressions Poetry Circle”
Description Seniors reflect on Easter and springtime by creating short poems or haikus. Then they decorate egg-shaped paper frames to showcase their work.
Supplies
Egg-shaped cardstock or heavy paper
Pens, pencils, or markers
Colorful scrapbook paper and/or stickers
Glue sticks
Ribbons (optional)
How-To Guide
Write Poems: Provide a simple poetry prompt (e.g., “Spring Renewal,” “Easter Morning,” or “Spring Flowers”). Encourage participants to write a short poem, haiku, or even a few lines of reflection.
Decorate Egg Frames: Give everyone an egg-shaped piece of cardstock to personalize. Seniors can collage scrapbook paper, draw designs, or place stickers around the border.
Attach the Poem: Glue or tape the poem in the center of the egg so it’s framed by their artwork.
Display: Hang finished poems on a bulletin board or in a hallway to showcase their creativity.
Why It’s Great
Combines creative writing with visual artistry.
Encourages self-expression and conversation about personal experiences.
7. “Peep Peek-a-Boo Door Hangers”
Description Craft adorable marshmallow “Peep” designs into door hangers or window decorations. This Easter décor is easy, cheerful, and guaranteed to bring a smile.
Supplies
Foam sheets or felt in pastel colors (pink, yellow, blue, purple)
Scissors
Black permanent marker (for eyes and nose)
Hole punch
Ribbon or yarn
Optional: Googly eyes, glitter glue
How-To Guide
Cut Peep Shapes: Trace and cut out simple bunny silhouettes from foam sheets or felt.
Add Features: Draw or glue on eyes and noses. If using googly eyes, attach them with craft glue.
Punch a Hole: At the top of the Peep shape, punch a small hole.
Thread Ribbon: Run ribbon or yarn through the hole, tie a loop, and you’ve got a door hanger!
Personalize: Add glitter, names, or short greetings like “Happy Easter!”
Why It’s Great
Quick and easy craft that can brighten living spaces.
Familiar nostalgic symbol (marshmallow Peeps) that sparks conversation.
8. “Easter Egg Mosaic”
Description
Transform your creative activity into a collaborative masterpiece by making a single, large paper mache egg that every senior can help decorate with their own unique mosaic contributions. This project not only sparks artistic expression but also brings everyone together as they share pieces of their personal stories and cultural heritage.
Supplies
For the Paper Mache Egg:
Egg Form Base:
A large balloon (to shape the egg) or an egg-shaped mold/frame
Paper Mache Materials:
Strips of newspaper or paper
Flour and water paste (or a mixture of white glue and water)
Optional:
A protective covering (newspaper or tablecloth) for your workspace
For the Mosaic Decoration:
Decorative Pieces:
Small torn pieces from old magazines, colored paper, fabric scraps, or any paper that holds personal meaning
Tools:
Scissors (or safety scissors for seniors)
Glue sticks or craft glue
Markers or pens
Optional:
Adhesive labels for adding personal notes or the significance behind each piece
Step-by-Step Instructions
1. Creating the Paper Mache Egg:
Prepare Your Workspace: Lay out newspapers or a protective covering to keep the area clean.
Form the Base:
Inflate a large balloon to your desired egg size.
Alternatively, use an egg-shaped mold or form a frame that can support the paper mache layers.
Mix the Paper Mache Paste:
Combine flour and water until smooth (or mix white glue with water).
Aim for a consistency similar to pancake batter.
Apply Paper Mache Layers:
Dip strips of newspaper into the paste, remove excess paste, and smooth them over the balloon/mold.
Overlap strips for a sturdy structure, covering the entire surface.
Allow each layer to dry partially before adding the next.
Apply 3–4 layers (more layers for extra strength) and let the egg dry completely.
Once dry, if you used a balloon, gently pop and remove it from the egg shell.
2. Decorating with Mosaic Pieces:
Gather Meaningful Pieces:
Encourage each participant to bring small pieces from magazines, colored paper, or fabric scraps that represent something personal—be it a cherished memory, a cultural symbol, or simply a favorite color.
Prepare the Pieces:
Have scissors available for seniors to cut or tear their items into small, mosaic-friendly fragments.
They can create uniform shapes or let the pieces vary in size and texture.
Design the Mosaic:
Spread out the mosaic pieces on a table so everyone can see the options.
Decide on a layout: participants might choose to work on specific sections, or they can apply their pieces wherever they feel inspired.
Use glue sticks or craft glue to affix the pieces onto the paper mache egg.
For an extra personal touch, participants can write short notes or labels next to their contributions.
Let It Dry:
Once all pieces are applied, allow the egg to dry completely, ensuring the mosaic pieces are firmly attached.
3. Display & Celebrate:
Showcase the Artwork: Display the completed mosaic egg in a common area—such as a hallway, lounge, or community room—so all participants can enjoy the collective artwork.
Reflect & Share: Consider hosting a small gathering where each participant can share the story or significance behind their mosaic pieces, further strengthening the sense of community and shared heritage.
Why This Activity Works
Encourages Self-Expression: Each mosaic piece is a unique contribution that tells a personal story, fostering meaningful self-expression.
Builds Community: By collaborating on one large project, participants develop a sense of connection and pride in a collective achievement.
Engages Creativity: The hands-on process of paper mache and mosaic design is both fun and therapeutic, sparking creativity and conversation.
Celebrates Heritage: Incorporating personal or cultural elements into the mosaic highlights the diversity and shared experiences of the group.
9. “Eggs-ercise Dice Roll”
Overview
Make movement fun with this Easter-inspired fitness game! Participants take turns rolling a giant foam die decorated with playful exercise prompts like “Chick Stretch” and “Bunny Hop.” The activity encourages gentle physical activity, teamwork, and lots of laughs—all while celebrating the spirit of Easter.
Materials & Supplies
Giant Die:
Option 1: A large foam die from a craft store
Option 2: A homemade die created from a sturdy cardboard box
Writing Tools:
Permanent markers or pre-printed labels to clearly mark each face
Support Items:
Chairs or other stable surfaces for balance or seated modifications
Additional Supplies:
A timer or stopwatch
A water bottle or hydration station for water breaks
Preparation Steps
Customize the Die:
Label each face of the die with a low-impact exercise. Consider creative, Easter-themed names such as:
Chick Stretch: Gentle neck or shoulder stretches
Bunny Hop: Light, seated or standing hops (low-impact version available)
Egg Roll: Smooth, rolling arm movements
Peep Parade: Marching in place with a playful twist
Carrot Reach: Seated or standing arm raises
Spring Squats: Modified squats or sit-to-stands (use a chair for support if needed)
Plan Demonstrations:
Prepare a brief demonstration of each exercise. Practice each movement yourself or with a volunteer to ensure clarity.
If possible, create visual aids (like simple printed instructions or images) to support verbal demonstrations.
Set the Scene:
Arrange the space so that everyone has enough room to move safely.
Ensure that chairs or other supports are within reach for participants who might need extra balance.
How-To Guide
Introduction & Warm-Up:
Gather everyone in a circle.
Briefly introduce the game, explaining that each die roll will determine a fun, low-impact exercise.
Lead a short warm-up (e.g., gentle stretching or slow marching) to prepare the body.
Rolling the Die:
Invite one participant to roll the die.
Once the die lands, announce the exercise on the top face and demonstrate it clearly.
Encourage everyone to participate together, adapting the movement as needed for their comfort and mobility.
Exercise Execution:
Perform the indicated exercise for a set time (e.g., 30 seconds) or a predetermined number of repetitions.
Modify the exercise for participants who prefer a seated option or require slower movements.
Rotation & Participation:
Continue passing the die to a new participant after each round.
Ensure everyone gets a chance to roll the die or lead a movement.
Encourage cheering and supportive comments to maintain a positive group atmosphere.
Hydration & Rest:
Schedule short hydration breaks between rounds.
Remind everyone to listen to their bodies—if any movement feels uncomfortable, encourage them to modify or take a brief rest.
Cool Down:
End the session with a gentle cool-down, such as slow breathing exercises or light stretching, to relax the muscles and heart rate.
Why It’s Great
Engaging & Fun:
Combines the excitement of a dice game with gentle physical activity.
Community Building:
Creates a group dynamic that encourages participation, laughter, and mutual support.
Customizable:
Easily adapted to various fitness levels and mobility needs.
Festive Spirit:
The Easter theme adds a playful twist, making exercise feel like a celebration.
10. “Sunrise Service Silhouettes”
Description Create stunning silhouette art inspired by an Easter sunrise. Seniors paint a colorful sunrise background, then overlay a black paper cut-out (such as a cross, bunny, or a simple church shape).
Supplies
White canvas or heavy paper
Watercolor paints or pastel chalks
Brushes or sponges
Black construction paper
Scissors
Glue sticks
How-To Guide
Paint the Sunrise: Use watercolors or chalk pastels to create blended sunrise colors (yellow, orange, pink, purple) across the entire page. Let dry.
Choose a Silhouette: Participants can pick a shape that represents Easter for them—anything from a simple cross to a bunny silhouette or a church.
Cut & Attach: Trace and cut the shape from black paper. Glue it onto the colorful background.
Display: Hang these silhouettes together to make an Easter-themed wall collage.
Why It’s Great
Offers a reflective, spiritual or symbolic dimension (if appropriate for your community).
Encourages color blending and creativity in a relaxed, low-pressure format.
Bringing It All Together
These ten activities offer a variety of options—creative crafts, gentle fitness, baking fun, and opportunities for reflection. Each project can be tailored to your center’s resources, the physical abilities of participants, and individual interests. By providing both communal and reflective moments, you’ll ensure that Easter 2025 is truly memorable for every senior in your care. Feel free to mix and match, and most importantly, have an egg-ceptional time celebrating together!
Browse thousands of Senior Centers from around America. Senior Centers are an integral part of society and are the center of life for many seniors and aging adults.
Find a Senior Center which fits your needs using our search feature and keep up to date on all the latest news.
Advertisers are not endorsed by SeniorCenters.com or any senior center listed. This site is not endorsed by or affiliated with any senior center or organization listed.
To provide the best experiences, we use technologies like cookies to store and/or access device information. Consenting to these technologies will allow us to process data such as browsing behaviour or unique IDs on this site. Not consenting or withdrawing consent, may adversely affect certain features and functions.
Functional
Always active
The technical storage or access is strictly necessary for the legitimate purpose of enabling the use of a specific service explicitly requested by the subscriber or user, or for the sole purpose of carrying out the transmission of a communication over an electronic communications network.
Preferences
The technical storage or access is necessary for the legitimate purpose of storing preferences that are not requested by the subscriber or user.
Statistics
The technical storage or access that is used exclusively for statistical purposes.The technical storage or access that is used exclusively for anonymous statistical purposes. Without a subpoena, voluntary compliance on the part of your Internet Service Provider, or additional records from a third party, information stored or retrieved for this purpose alone cannot usually be used to identify you.
Marketing
The technical storage or access is required to create user profiles to send advertising, or to track the user on a website or across several websites for similar marketing purposes.