Introduction
Thanksgiving is a cherished time to gather with loved ones and reflect on the blessings of the year. Creating a festive atmosphere in your home enhances the holiday spirit and makes your guests feel welcome. Whether you’re a novice crafter or a DIY veteran, this comprehensive guide offers a variety of Thanksgiving decoration projects suited to different skill levels and budgets. From simple, budget-friendly crafts to more elaborate creations, you’ll find the perfect project to adorn your home this Thanksgiving.
Easy and Affordable DIY Decorations

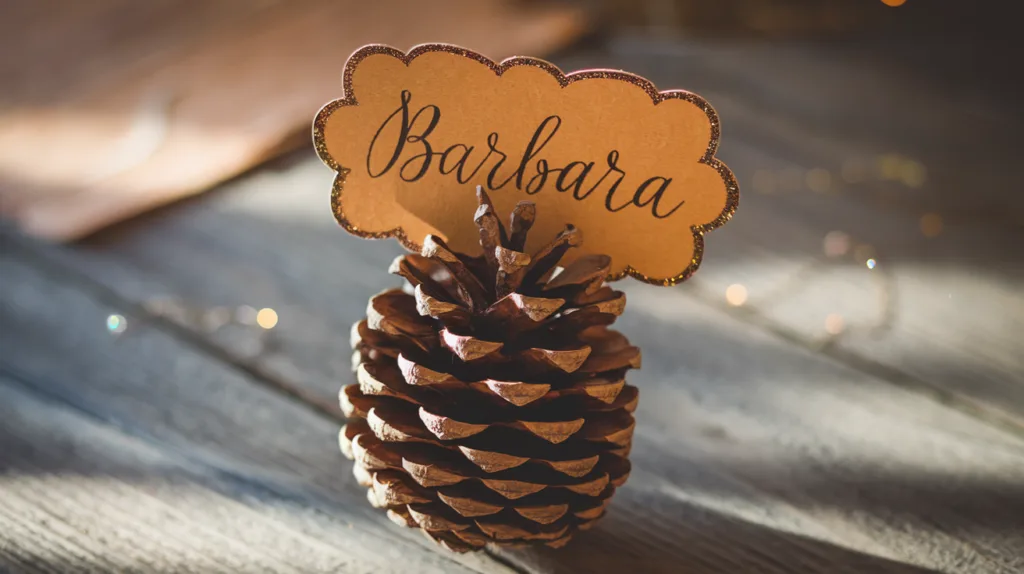
1.1. Pinecone Place Cards
Materials Needed:
- Pinecones (collected or purchased)
- Cardstock or thick paper
- Scissors
- Pen or marker
- Optional: Glitter, glue
Estimated Cost: $0 – $5
Instructions:
- Collect Pinecones: Gather pinecones from your backyard or a local park. Ensure they are clean and dry.
- Prepare Name Cards: Cut cardstock into small rectangles or decorative shapes.
- Personalize: Write each guest’s name on the cards. For an added touch, you can decorate the edges with glitter or autumn-themed stickers.
- Assemble: Slide the name card into the pinecone scales so it stands upright.
- Place on Table: Arrange the pinecone place cards at each setting.
Difficulty Level: Easy

1.2. Mason Jar Leaf Lanterns
Materials Needed:
- Mason jars
- Mod Podge or white glue
- Foam brush
- Dried or faux autumn leaves
- Tea light candles or LED candles
- Twine or ribbon
Estimated Cost: $5 – $10
Instructions:
- Clean Jars: Ensure the mason jars are clean and dry.
- Apply Glue: Using the foam brush, apply a thin layer of Mod Podge or glue to the outside of the jar.
- Attach Leaves: Press leaves onto the glued surface, smoothing out any wrinkles.
- Seal Leaves: Apply another layer of glue over the leaves to seal them.
- Dry: Allow the jars to dry completely.
- Add Twine: Wrap twine or ribbon around the mouth of the jar for decoration.
- Insert Candle: Place a tea light or LED candle inside.
- Display: Arrange the lanterns on your table or mantelpiece.
Difficulty Level: Easy

1.3. Paper Leaf Garland
Materials Needed:
- Colored construction paper or cardstock (in autumn colors)
- Leaf templates (printable or hand-drawn)
- Scissors
- Hole punch
- Twine or string
- Optional: Glitter, markers
Estimated Cost: $3 – $8
Instructions:
- Create Leaf Shapes: Trace and cut out leaf shapes from the colored paper.
- Decorate Leaves: Add glitter or write messages of gratitude on the leaves.
- Punch Holes: Use a hole punch to make a hole at the top of each leaf.
- String Leaves: Thread the twine or string through the holes to create a garland.
- Hang Garland: Drape the garland over doorways, windows, or along the mantel.
Difficulty Level: Easy
Moderate Difficulty DIY Decorations

2.1. Thankful Tree Centerpiece
Materials Needed:
- Branches (collected from outside)
- Vase or decorative pot
- Small cardstock or paper tags
- Twine or ribbon
- Pebbles or sand
- Pens or markers
Estimated Cost: $10 – $20
Instructions:
- Prepare Base: Fill the vase or pot with pebbles or sand to stabilize the branches.
- Assemble Tree: Arrange the branches in the vase to resemble a small tree.
- Create Tags: Cut cardstock into leaf or tag shapes.
- Write Messages: Encourage family and guests to write what they are thankful for on the tags.
- Attach Tags: Tie the tags to the branches using twine or ribbon.
- Display: Use the Thankful Tree as a meaningful centerpiece.
Difficulty Level: Moderate
2.2. Autumn Wreath with Faux Foliage

Materials Needed:
- Grapevine wreath form
- Faux autumn leaves, berries, and flowers
- Hot glue gun and glue sticks
- Ribbon for hanging
- Wire cutters
Estimated Cost: $15 – $30
Instructions:
- Plan Design: Lay out your faux foliage around the wreath form to plan your design.
- Attach Foliage: Use the hot glue gun to secure leaves and flowers to the wreath.
- Layering: Start with larger leaves and add smaller elements like berries for depth.
- Add Ribbon: Tie a ribbon around the top for hanging or as a decorative bow.
- Hang Wreath: Display on your front door or above the fireplace.
Difficulty Level: Moderate

2.3. Pumpkin Succulent Planters
Materials Needed:
- Small to medium-sized pumpkins
- Succulents or small plants
- Potting soil
- Spoon or scoop
- Knife
Estimated Cost: $20 – $40
Instructions:
- Prepare Pumpkin: Cut off the top of the pumpkin and scoop out the insides.
- Fill with Soil: Add a layer of potting soil inside the pumpkin.
- Plant Succulents: Arrange succulents in the soil, pressing gently to secure them.
- Optional Sealing: To prolong the life of the pumpkin, spray the inside with a sealant or line it with a plastic bag before adding soil.
- Display: Use as a centerpiece or decorative accent.
Difficulty Level: Moderate
Advanced DIY Decorations

3.1. Quilted Thanksgiving Table Runner
Materials Needed:
- Assorted fabrics in fall colors and patterns
- Quilting batting
- Sewing machine
- Thread
- Rotary cutter or scissors
- Quilting pins
- Iron
Estimated Cost: $30 – $60
Instructions:
- Select Fabrics: Choose a mix of patterns and solids that complement each other.
- Cut Fabric Strips: Cut fabric into strips or squares, depending on your design.
- Assemble Top Layer: Sew the pieces together to create the top of the runner.
- Layering: Place the batting between the top layer and a backing fabric.
- Pin Layers: Secure the layers together with quilting pins.
- Quilting: Stitch through all layers, either by following the seams or creating a quilted pattern.
- Finish Edges: Trim any excess fabric and sew a binding around the edges.
- Press: Iron the table runner to smooth out any wrinkles.
Difficulty Level: Advanced

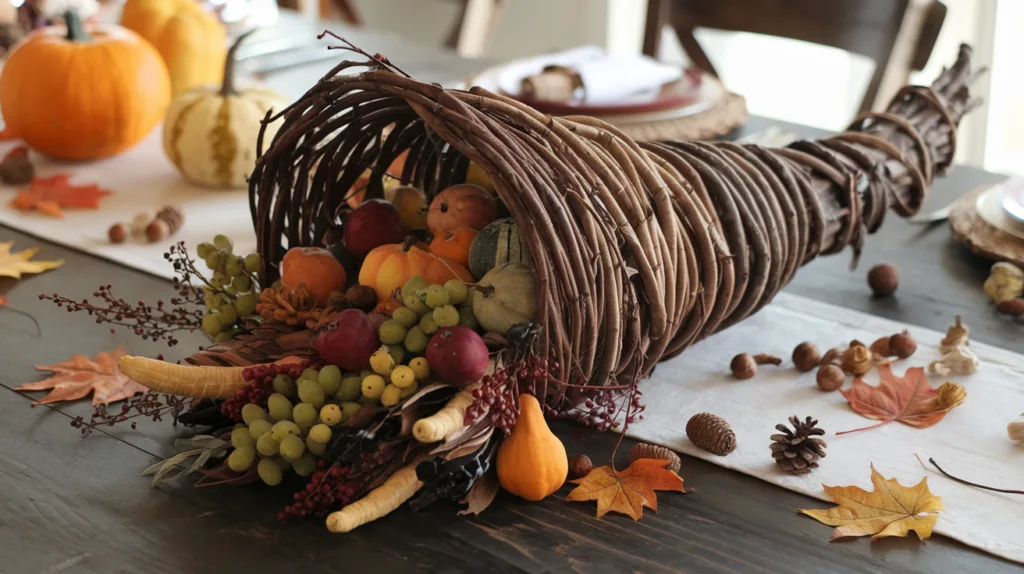
3.2. Handmade Cornucopia
Materials Needed:
- Willow branches or grapevines
- Floral wire
- Pliers
- Dried or faux fruits and vegetables
- Burlap or fabric scraps
- Hot glue gun
Estimated Cost: $25 – $50
Instructions:
- Create Cornucopia Shape: Bend willow branches into a cone shape, securing with floral wire.
- Weave Structure: Wrap additional branches around the frame to strengthen and shape the cornucopia.
- Secure Ends: Tuck in and secure loose ends with wire or hot glue.
- Add Lining (Optional): Line the inside with burlap to prevent items from falling through.
- Fill Cornucopia: Arrange dried or faux fruits, vegetables, and leaves spilling out of the opening.
- Display: Place on a table or at the entrance to welcome guests.
Difficulty Level: Advanced

3.3. Rustic Wooden Signage
Materials Needed:
- Reclaimed wood or wooden pallet
- Sandpaper
- Acrylic paint or wood stain
- Paintbrushes
- Stencils or vinyl lettering
- Hanging hardware
Estimated Cost: $20 – $40
Instructions:
- Prepare Wood: Sand the wood to remove splinters and smooth the surface.
- Apply Base Coat: Paint or stain the wood and allow it to dry.
- Design Layout: Plan your message, such as “Give Thanks” or “Happy Thanksgiving.”
- Apply Lettering: Use stencils or apply vinyl letters to create the text.
- Paint Text: Paint over the stencils or around the vinyl letters.
- Remove Stencils/Vinyl: Carefully remove to reveal the lettering.
- Finish: Add any additional decorative elements and attach hanging hardware.
- Display: Hang the sign in your entryway or above the fireplace.
Difficulty Level: Advanced
Tips for Decorating on a Budget
- Nature’s Bounty: Utilize natural elements like leaves, pinecones, and branches.
- Thrift Finds: Shop at thrift stores for unique and affordable décor pieces.
- Repurpose Items: Give old decorations new life with a fresh coat of paint or new arrangement.
- Bulk Supplies: Purchase materials in bulk to save costs for larger projects.
- Family Craft Time: Involve family members in crafting to create meaningful decorations and memories.
Conclusion
Decorating for Thanksgiving can be a rewarding experience that brings warmth and joy to your home. Whether you choose simple projects that are quick and easy or more complex creations that showcase your crafting skills, there’s something for everyone. Embrace the spirit of gratitude and togetherness by personalizing your space with decorations that reflect your style and the essence of the holiday. Happy crafting and Happy Thanksgiving!
By following this guide, you’ll be well on your way to creating a festive and inviting atmosphere that celebrates the season’s beauty and the joy of gathering with loved ones.


